Flipping the script on an event video: Mexico edition

When we were asked to travel over 5,000 miles to cover an annual summit for Trex, the answer was obviously yes. But there was a challenge. Most event videos follow the same formula - capture the key moments, wrap it up neatly and have a pint.
However, we were flying all the way to Mexico for this shoot. So it needed to be bigger, better and bolder than anything we’d done before. Followed by tequila, of course. A pint just wouldn’t cut it.
Rather than just filming another standard event recap, we flipped the script and created a cinematic travel film. One that showcased the experience, the setting, and the vibe in a way that stood out.
It still hit all the key beats that Trex needed, but with a fresh, engaging approach that made it feel bigger than just an event.
Pre-production
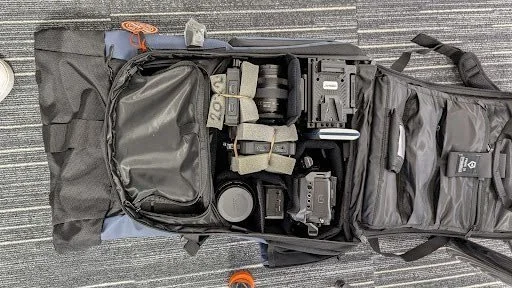
We wanted to remove as much guesswork as possible from the shoot. But with no clear schedule of events, creating a tight shot list was near impossible. The best we could do was pack as much gear as possible and be ready for anything that was thrown our way.
First, we had to ensure our carnet form was correctly filled out for Mexico City airport customs. Since every piece of kit had to be listed, we had to strike a balance between packing light and being well-equipped.
Gear List:
Sony FX3 with Cineback cage
ND Filters
Lens: 24-70mm
Drone
Monitor (plus client monitor)
Sennheiser MKH 8060 + Zoom F3 (and a ShitRig - more to come)
Zhiyun light
Aputure MC & Aputure MT
Batteries, cables, and other essentials
This kit made for one heavy backpack, but every item was needed and used - even if not used in a way that was originally intended.
Since we couldn’t physically scout locations beforehand, we had to find workarounds. Google Maps helped us get our bearings, while a sun-tracking app allowed us to plan golden hour shots in advance.
Production
Creating a cinematic travel video that also functions as an event/conference recap isn’t an easy task. When you’re looking over the blue sea, with golden beaches and palm leaves, it’s really tempting to focus purely on the lifestyle, nature and vibe of a stunning location like Los Cabos.
However we also needed to balance storytelling and brand messaging while keeping it visually compelling and pushing creative boundaries.
Most event videos treat the location as a backdrop, we aimed to make it the main character.
Our shooting approach:
Handheld over static shots: We opted for movement-driven handheld shots to pull viewers into the action, ditching a gimbal entirely which is an unconventional choice for a shoot like this
Intentional static shots: The only exceptions were carefully composed ‘postcard’ shots, designed to capture the calmness of mornings and evenings. These contrasted with the higher intensity shots featuring fire dancers and whales
Shutter speed experimentation: For high-energy moments (like the Hibachi Chefs and Fire Dancers), we intentionally cranked the shutter angle to 45 degrees, achieving that crisp, staccato motion you see in action films
No slow motion: While it’s a go-to for travel and event videos, we ditched slow-mo entirely. We wanted a raw, lively feel rather than something overly polished. The whole shoot was shot at 25fps
Tim’s top tip
How to create shutter drag transitions
One technique I use often is shutter drag frames for fast-paced transitions. Here’s how:
Drop the shutter speed to around 1/10 (or lower)
Wave the camera wildly to create motion blur - you’ll look a bit mad but it’s worth it
In the edit, extract about four frames from the moment with the highest speed
Use these frames as seamless, energetic transitions
This is a really great way of adding a bit of motion between scene changes or when a cut feels…off.
The ‘Shit Rig’ Moment
I’ve made it sound like everything went smoothly on this trip - obviously no shoot is without its unexpected challenges. An issue we had was that our boom pole had the wrong adapter for our mic.
Thankfully our creative director Jon had a brilliant idea and improvised a (what we call in the industry) ‘shit rig’ using a magic arm, clamp and velcro to hold the mic in place. It looked ridiculous but the audio sounded great.
ShitRigs work. If something breaks, get creative.

Post-production
I always start with sound design. It helps build the narrative flow before I even touch the visuals.
First, I found a cinematic track and layered it with ambient noises, whooshes, risers, drones, clicks and camera SFX.
Something I kept in mind was incorporating moments of ‘cinematic rest’ in the edit. This means that when the music and visuals reach a crescendo, I like to go against the grain and cut to moments of silence, with diegetic sounds to really push the ambience, before cutting back into the action.
This contrast enhances the impact of the edit. Letting a scene breathe can be more impactful than constant music.
Our attention spans are short, so the opening had to be eye-catching. I always like to make sure the first 3-5 seconds of my edit are something fast and interesting.
Instead of a standard drone shot intro, I started with a flash cut sequence with rapid SFX before transitioning into a slow, sweeping drone shot. This subverts expectations and hooks the audience from the get-go.
As for the colour grade, I created a ‘look’ (some creative contrast and soft split toning in the shadows and highlights) which I used across each scene. I also used a Kodak 2383 film emulation and added some film grain and a slight halation.
This added to the feel of the travel video - whilst also being different to normal event videos - which usually are quite bright and airy.
Final thoughts
By weaving Mexico into the story rather than just using it as a backdrop, we turned a standard event recap into something immersive and cinematic. The handheld, movement-driven shots gave it energy, while bold editing choices made it feel fresh.
This project was a reminder that taking creative risks is always worth it - and I’d jump at the chance to do it all over again.
See more cinematic masterpieces from Tim and the team here.